


GEOPHYSICS! (English Version)
Now we have to talk a bit of geophysics, a small part of what is working, that it would be normal to present a geophysical report for a company, I'm talking about cuts geoelectric or geoelectric profiles which are very important in a job geophysical exploration and interpretation because help a lot us when we are working on for minerals or in finding groundwater or in the search for groundwater reservoirs. But how can we use the geoelectric profiles to find what I point?
Now we have to talk a bit of geophysics, a small part of what is working, that it would be normal to present a geophysical report for a company, I'm talking about cuts geoelectric or geoelectric profiles which are very important in a job geophysical exploration and interpretation because help a lot us when we are working on for minerals or in finding groundwater or in the search for groundwater reservoirs. But how can we use the geoelectric profiles to find what I point?
 |
| Geoelectric profile. |
First we must understand that the geoelectric profiles are an indirect and secondary geophysical work, because the data are first taken in the field, depending on the type of work that Realize, to develop these
profiles at the end of the report help us to interpret what we find and express well our findings indicating after our recommendations.
Ok! Geoelectric profiles are a manifestation of the data collected in the field when the inject field by returning a value, which collect and then draw them on logarithmic paper and get our raw data that will later be accommodated or soft for interpretation.
When we want to say that raw data is the data directly collected from the field and the team, and have not been corrected or modified if you have bad data grouped.
This data field will give us an idea of what we found in the basement and that will allow computer programs using our curves soften and then generate our geoelectric profiles.
You remember how it works in the field of SEV see our videos at: http://geofisica-guszav.blogspot.com/2011/02/sondaje-electrico-vertical-sev.html
To develop our geoelectric profile must take into account the following:
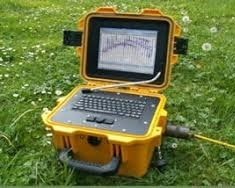
1. Data obtained from the field using our equipment resistivities.
2. Development of geoelectric curves indicating the number of layers or strata encountered and the resistivities found for that layer or stratum.
3. Materials desktop, like pencils, paper log, etc..
4. Resisitividades table of geological materials, soil and rock types, including minerals.
5. Geological maps of the study area, will help us to get an idea of what we might have in the ground to a certain depth.
Ok! We have everything to make our profile geoelectric! What now? The traditional method can be used in geophysics for geoelectric profiling is the SEV method, what does? Sev is the Spanish acronym Vertical Electrical Sounding, which in short, would be to inject current to ground at a single point to determine the number of strata or layers encountered when current injected, and at the time we returned the apparent resistivity found at greater depths. But when we want to develop our geoelectric profiles must use at least two SEV, is the minimum amount in order to draw a geoelectric profile to interpret. After having our SEV available, what we must do now is to group such as SEV 1 and SEV 2 SEV 3, and to then use another profile with other SEV, eg, SEV 4 SEV 5 to SEV 6; or this other way, SEV 1, SEV 3 and SEV 5. These distributions depend on the characteristics of the land or raw curves of the field. In any situation also depend on the criterion that has the group the SEVS geophysicist properly.
After having grouped our SEV start drawing geoelectric profiles.
Firstly, we get a table indicating each SEV our horizons and simultaneously in each horizon to indicate the layer thickness and the resistivity found for that stratum. Once this is done for all SEV proceed to draw.
 First, we draw vertical lines for our SEV 1 SEV SEV 2 and 3 (take these SEV as an example). In these vertical lines will place thicknesses numerical values we found when relizamos our papers logarithmic curves for all horizons found also for each SEV.
After having grouped our SEV start drawing geoelectric profiles.
Firstly, we get a table indicating each SEV our horizons and simultaneously in each horizon to indicate the layer thickness and the resistivity found for that stratum. Once this is done for all SEV proceed to draw.
First, we draw vertical lines for our SEV 1 SEV SEV 2 and 3 (take these SEV as an example). In these vertical lines will place thicknesses numerical values we found when relizamos our papers logarithmic curves for all horizons found also for each SEV.
Second, we work with all first SEVS horizons of all, drawing the thickness indicating its numerical value. So do all the SEVS. This is when we work with thickness, but if we work with the situation is different depths. But we will work with thicknesses practical use.
Third, to advance to the second horizon of all we calculate SEVS because this picture should be at an appropriate scale, placing each SEV thickness, and so on until all the existing horizons for all SEVS.
and fourth, when completed this we draw the boundaries of the strata by matching the thickness of all SEVS E1, E2 thickness then all SEVS and so on for all SEVS, finally indicate the resistivity stratum found in each SEV.
So simple is to develop a profile geoelectric obviously special computer software will allow me to do this, but it's always good to know how to perform hand these profiles to learn how to really work, remember
that software is created for us to save time, but also good to know the method we are using, so in this way it will be easier to develop our interpretations and conclusions.
I offer some special bibliographies that you can use in your geophysical survey.
Of course some videos: Just check out the entry in http://geofisica-guszav.blogspot.com/2011/02/sondaje-electrico-vertical-sev.html
Any suggestions, comments, questions or concerns please cause me to know marvar26@gmail.com


0 Comments:
Publicar un comentario
No olvides de escribir tu opinión personal de nuestro blog, una página o información que desees comprtir. Todos los éxitos para ti. Gustavo Zavala.